- Solutions
- For Industry
- By Need
- Products
- VarbaseEnterprise CMS Distribution for Drupal
- Uber PublisherEnterprise Digital Media Platform Builder
- VardocDrupal Knowledge Base Platform
- Campaign StudioOpen Marketing Platform - by Acquia
- Open SocialSocial Business Platform - by Open Social
- Services
- Strategy
- Design
- Development
- Migration
- Support and MaintenanceSupport and Maintenance
- DevOps
- Digital Marketing

ندوة عبر الإنترنت
- Clients
- Ideas
- About
- Contact Us

Generating PDF from Webform Submissions on Drupal
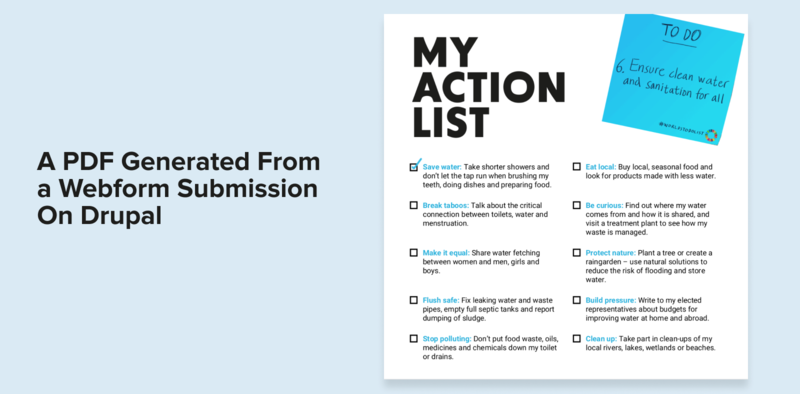
There will come a time and purpose where users would need or want to generate a PDF file from a Webform submission from your Drupal website. Have no worries if you have not yet integrated this feature. In this detailed blog, we will walk you through steps of making this option available to your users, allowing them the ability to download, customize and theme their PDF files from a Webform submission.
In this blog, We’ll cover three steps to help you generate PDF from Webform submissions on Drupal
- How to set up the Tools and Environment
- How to configure permissions
- Advanced form customization
Setting up the Tools and Environment
You have several options and modules to choose from, however in this guide we recommend you to work with Entity Print module and Mpdf engine as the latter has excellent support for most languages.
What is Entity Print?
Entity Print is a Drupal module that allows you to easily print any Drupal entity, including nodes, views, and fields, as a PDF document. It integrates with many popular Drupal modules, such as Views and Webform, making it a versatile and flexible tool for generating PDFs.
What is Mpdf?
Mpdf is a PHP library for generating PDF documents from HTML. It is fast, efficient, and produces high-quality PDFs. Entity Print makes use of the Mpdf library to generate PDFs from Drupal entities.
Installing Entity Print and Mpdf
Install the Entity Print and Mpdf modules. You can do this either by downloading the modules from the Drupal website and uploading them to your site, or by using the Drupal module installer.
To install the Entity Print module, run:
composer require drupal/entity_print
Now we need to enable Entity Print and Webform Entity Print which is installed with webform by default by running:
drush en entity_print webform_entity_print
Currently, Entity Print doesn't support Mpdf out of the box, but a patch was created for that in this issue. To install the patch, you need to add it to your composer.json as follows:
"extra": {
  "patches": {
    "drupal/entity_print": {
      "Issue #3063998: mPDF Plugin": "https://www.drupal.org/files/issues/2022-12-01/3063998-18.patch"
    }
  }
}
Now you’re ready to install Mpdf itself:
composer require mpdf/mpdf
Configuration
Before you can generate a PDF from a Webform submission, you need to configure the following:
Permissions
You’ll need to grant Webform submission: Use all print engines permission to the roles we want them to be able to use the feature.
Entity Print configuration
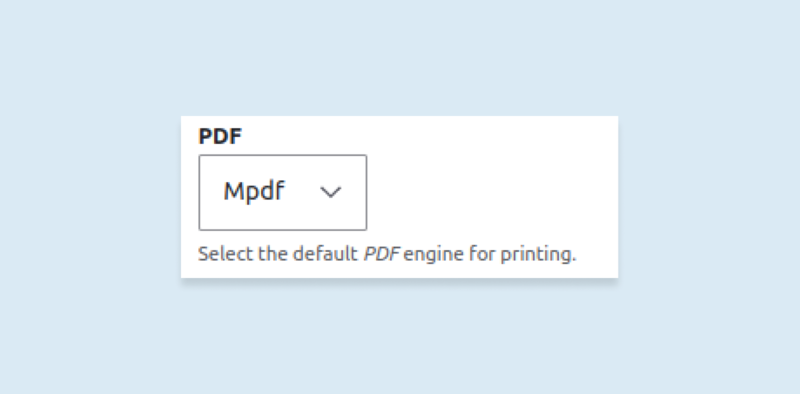
Navigate to /admin/config/content/entityprint, and change the PDF engine to Mpdf

You can also control the PDF margins, paper orientation, and paper size after you select Mpdf. After doing so, you will find a new Download PDF button when visiting any webform submission. /admin/structure/webform/manage/MY_WEBFORM/submission/SUBMISSION_ID
Webform Entity Print
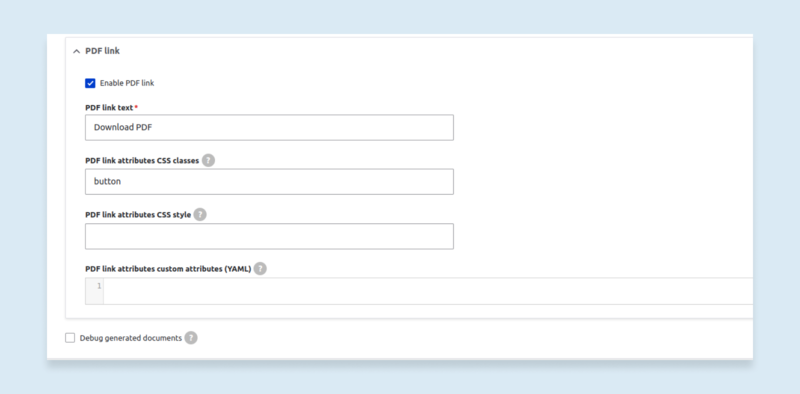
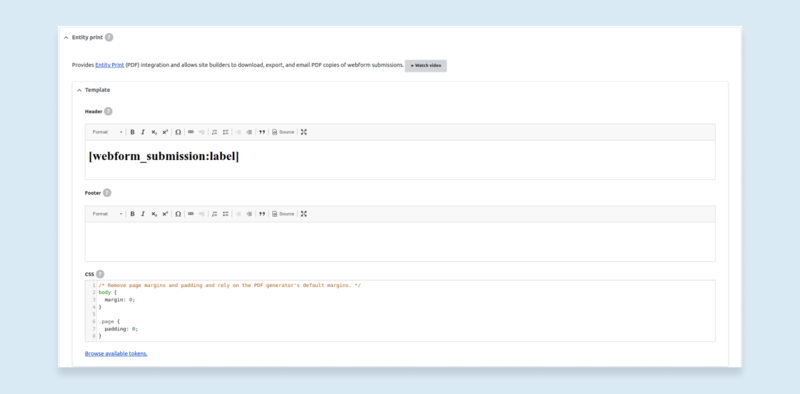
If you want to do some simple modifications to the generated PDF, you can go to /admin/structure/webform/config and scroll down to Entity Print. Here you can customize the header, the footer, and the download link and add custom CSS to your PDF.
Please note that dealing with print engines is different from regular HTML and CSS rendered by a browser, and therefore not all normal CSS is supported; each engine has its limitations. You can refer to the Mpdf documentation to check its limitations.


Advanced Customization
If you're looking to further customize the PDF output, you can do so by modifying the template used to render the HTML in the PDF and attaching your own custom CSS through your theme.
Advanced Customization Using Twig and CSS
To modify the template, create a new twig file and place it under the templates folder in your custom theme, following the Drupal twig naming convention. For instance, you can name the file "entity-print--webform-submission.html.twig" to apply the template to all PDFs generated from a webform submission. Alternatively, you can apply the template to a specific webform by naming the file "entity-print--webform-submission--MY_WEBFORM.html.twig".
Within the template file, you can utilize the usual twig language and modify the variables passed to the template using the hook_preprocess_entity_print() function.
To add custom CSS, simply include the following code in your THEME.info.yml file:
entity_print:
   all: 'THEME/pdf-styles'
Then, create a pdf-styles library in the THEME.libraries.yml file like you would with any other library:
pdf-styling:
  css:
    theme:
      css/theme/pdf.theme.min.css: { minified: true }
This will attach your custom CSS to the PDF output, allowing for even greater customization.
Advanced Customization With Mpdf
If you resort to using the Mpdf engine with the Entity Print patch, then you can unlock the abilities to add custom fonts per language and change the value of any Mpdf configuration parameter using an event subscriber.
How to Create an Event Subscriber?
In a custom module, create an event subscriber under src/EventSubscriber and name it as you like; we will use PrintConfigAlterSubscriber in our example.
<?php

namespace Drupal\MY_CUSTOM_MODULE\EventSubscriber;

use Symfony\Component\EventDispatcher\EventSubscriberInterface;

/**
 * Alter the configuration used to generate PDF.
 */
class PrintConfigAlterSubscriber implements EventSubscriberInterface {

}
Now let's add this event subscriber to MY_CUSTOM_MODULE.services.yml:
services:
  MY_CUSTOM_MODULE.event_subscriber:
    class: Drupal\MY_CUSTOM_MODULE\EventSubscriber\PrintConfigAlterSubscriber
    tags:
      - { name: even_subscriber }
Next, we will implement getSubscribedEvents() method:
<?php

namespace Drupal\MY_CUSTOM_MODULE\EventSubscriber;

use Symfony\Component\EventDispatcher\EventSubscriberInterface;
use Drupal\entity_print\Event\PrintEvents;

/**
 * Alter the configuration used to generate PDF.
 */
class PrintConfigAlterSubscriber implements EventSubscriberInterface {

  /**
   * {@inheritdoc}
   */
   public static function getSubscribedEvents() {
     return [PrintEvents::CONFIGURATION_ALTER => 'configAlter'];
   }

}
This event is fired right before creating the Mpdf instance, and we will modify the configuration passed to Mpdf in configAlter() method that we attached in getSubscribedEvents() method:
<?php

namespace Drupal\MY_CUSTOM_MODULE\EventSubscriber;

use Symfony\Component\EventDispatcher\EventSubscriberInterface;
use Drupal\entity_print\Event\PrintEvents;

/**
 * Alter the configuration used to generate PDF.
 */
class PrintConfigAlterSubscriber implements EventSubscriberInterface {

  /**
   * {@inheritdoc}
   */
   public static function getSubscribedEvents() {
     return [PrintEvents::CONFIGURATION_ALTER => 'configAlter'];
   }

  /**
   * Alter the config of Mpdf before being passed to the engine.
   *
   * @param \Symfony\Component\EventDispatcher\GenericEvent $event
   *   The event object.
   */
   public function configAlter(GenericEvent $event) {
     // We're only targeting Mpdf because each engine is dealt with differently.
     if ($event->getArgument('config')->id() != 'mpdf') {
       return;
     }

     // We want to build an array that contains our custom configuration.
     $config = [
       // As an example we will change the default value for ignore_table_percents.
       // All configuration variables that you can overwrite can be found in mpdf/mpdf/src/Config/ConfigVariables.php
       'ignore_table_percents' => TRUE,
     ];

     // Keep other configuration variables that are either provided by default or
     // added by changing Entity Print configuration from the UI.
     $finalConfig = $config + $event->getArgument('configuration');

     // Set the configuration that will be sent to Mpdf to $finalConfig array.
     $event->setArgument('configuration', $finalConfig);
   }

}
And this is how you change the Mpdf configuration, however fonts are a special case. In the next few lines of code, we will make some changes to our event subscribers and create a new class.
Customizing Fonts
To make this easier to follow, let us assume your website have two languages and you would like to use different font family for each one, with two variations for each; regular and bold. This is typically how you would want to approach it:
<?php

namespace Drupal\MY_CUSTOM_MODULE\EventSubscriber;

use Symfony\Component\EventDispatcher\EventSubscriberInterface;
use Drupal\entity_print\Event\PrintEvents;
use Mpdf\Config\FontVariables;
use Drupal\MY_CUSTOM_MODULE\Language\MyCustomModuleLanguageToFont;

/**
 * Alter the configuration used to generate PDF.
 */
class PrintConfigAlterSubscriber implements EventSubscriberInterface {

  /**
   * {@inheritdoc}
   */
   public static function getSubscribedEvents() {
     return [PrintEvents::CONFIGURATION_ALTER => 'configAlter'];
   }

  /**
   * Alter the config of Mpdf before being passed to the engine.
   *
   * @param \Symfony\Component\EventDispatcher\GenericEvent $event
   *   The event object.
   */
   public function configAlter(GenericEvent $event) {
     // We're only targeting Mpdf because each engine is dealt with differently.
     if ($event->getArgument('config')->id() != 'mpdf') {
       return;
     }

     // Let's get the default font configuration so we don't lose any defaults.
     $defaultFontVariables = (new FontVariables())->getDefaults();

     // We want to build an array that contains our custom configuration.
     $config = [
       // As an example we will change the default value for ignore_table_percents.
       // All configuration variables that you can overwrite can be found in mpdf/mpdf/src/Config/ConfigVariables.php
       'ignore_table_percents' => TRUE,

       // We want to add the paths to the directories where our font files live so that Mpdf can include them.
       'fontDir' => [
         'EXAMPLE/PATH/FONTS',
         'modules/custom/MY_CUSTOM_MODULE/fonts',
       ],

       // Next, we define our fonts which Mpdf will look for in the paths provided above.
       'fontdata' => [
         // Note that the font key has to contain lowercase ONLY
         'bdsupper' => [
           // Here we provide the names for the files containing the font itself, the keys can be
           // "R", "B", "I"; for Regular, Bold, and Italic, and any key can be omitted except "R".
           'R' => 'BDSupperRegular.ttf',
           'B' => 'BDSupperBold.ttf',
         ],
         'notosansarabic' => [
           'R' => 'NotoSansArabic-Regular.ttf',
           'B' => 'NotoSansArabic-Bold.ttf',
           'useOTL' => 0xFF, // Some keys can be used for specific languages for better support (Refer to Mpdf docs).
         ],
       ] + $defaultFontVariables['fontdata'], // Keep unchanged defaults.
       'languageToFont' => new MyCustomModuleLanguageToFont(), // This is a special class that we will create next to provide a mapping between languages and fonts
     ];

     // Keep other configuration variables that are either provided by default or
     // added by changing Entity Print configuration from the UI.
     $finalConfig = $config + $event->getArgument('configuration');

     // Set the configuration that will be sent to Mpdf to $finalConfig array.
     $event->setArgument('configuration', $finalConfig);
   }

}
Now, for our next trick, we'll create MyCustomModuleLanguageToFont class that will determine which font should be attached to which language.
Under MY_CUSTOM_MODULE/src/language create the following class:
<?php

namespace Drupal\MY_CUSTOM_MODULE\Language;

use Mpdf\Language\LanguageToFont;

class MyCustomModuleLanguageToFont extends LanguageToFont {

  /**
   * {@inheritdoc}
   */
  public function getLanguageOptions($llcc, $adobeCJK) {
    $unifont = NULL; // Default value

    switch ($llcc) {
      case 'en':
        $unifont = 'bdsupper';
        break;

      case 'ar':
      case 'und-arab': // Sometimes Mpdf will be able to identify the script but not the language so the value will be "und-arab".
        $unifont = 'notosansarabic';
        break;
    }

    if ($unifont) {
      return ['false', $unifont]; // Return the determined font name.
    }

    // If we were unable to identify the language, fallback to defaults.
    return parent::getLanguageOptions($llcc, $adobeCJK);
  }

}
After implementing this class, you will have the BDSupper font family available for any PDF containing English scripts and NotoSansArabic available for Arabic.
Advanced Customization Using Twig and CSS
To modify the template, create a new twig file and place it under the templates folder in your custom theme, following the Drupal twig naming convention. For instance, you can name the file "entity-print--webform-submission.html.twig" to apply the template to all PDFs generated from a webform submission. Alternatively, you can apply the template to a specific webform by naming the file "entity-print--webform-submission--MY_WEBFORM.html.twig".
Within the template file, you can utilize the usual twig language and modify the variables passed to the template using the hook_preprocess_entity_print() function.
To add custom CSS, simply include the following code in your THEME.info.yml file:
entity_print:
   all: 'THEME/pdf-styles'
Then, create a pdf-styles library in the THEME.libraries.yml file like you would with any other library:
pdf-styling:
  css:
    theme:
      css/theme/pdf.theme.min.css: { minified: true }
This will attach your custom CSS to the PDF output, allowing for even greater customization.

Need World Class Web Development? Let's Talk.
Summing Up
In conclusion, generating a PDF from a webform submission on Drupal can be easily accomplished with the help of modules like Entity Print and MPDF engine. With a few simple steps, you can configure and customize the output of your PDF document to fit your specific needs. Whether you're looking to create a simple form submission confirmation or a detailed report, these modules offer flexible options to help you achieve your desired outcome. By implementing these techniques, you can improve the functionality and accessibility of your Drupal website for your users. So why wait? Start creating your own PDFs from webform submissions today!


